Whether you are saving a funny meme, putting together a technical support ticket, or compiling a step-by-step tutorial for your own documentation, knowing how to capture your Windows screen effectively is an essential daily skill. Over the years, Microsoft has introduced multiple built-in utilities to make capturing, editing, and sharing your display easier than ever.
In this comprehensive guide, we will walk you through every native method available on modern Windows operating systems, ranging from quick keyboard shortcuts to advanced annotation tools.
For most users, the Snipping Tool is the go-to utility because it gives you precise control over what you want to capture without saving unnecessary clutter to your disk.
How to use it:
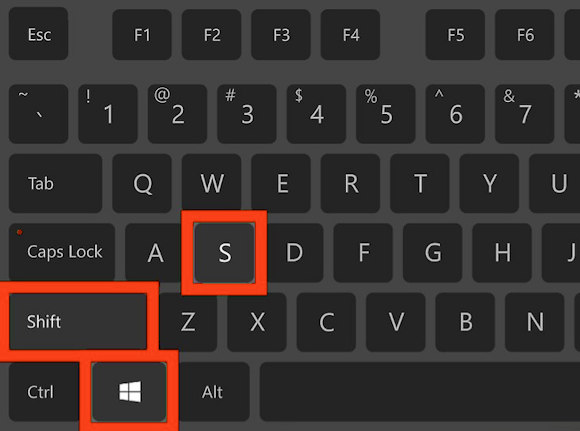
Press Windows Logo Key + Shift + S simultaneously on your keyboard.
Your screen will dim slightly, and a compact toolbar will appear at the very top center of your display.
Choose one of the four capture modes available on the toolbar:
Rectangular Mode: Click and drag your mouse cursor to form a custom rectangular box around the area you want to save.
Freeform Mode: Draw a completely freeform shape around an object using your mouse or trackpad.
Windows Mode: Hover over a specific open application window or browser tab and click once to capture just that window.
Full-screen Mode: Instantly captures your entire desktop layout across all active monitors.
Once you make your selection, the screenshot is automatically copied to your clipboard.
A small notification preview will pop up in the bottom-right corner of your screen. Click this notification to open the full Snipping Tool editor, where you can crop the image, draw highlights, or save it directly to your hard drive.
2. The Instant Auto-Save Method: Win + PrtScn
If you are working quickly and need to capture your entire screen and save it directly as an image file without opening any intermediate editors, this is the best combination.
How to use it:
Press Windows Logo Key + Print Screen (often labeled as PrtScn, PrtSc, or PrintScrn on your keyboard).
Your screen will briefly flicker or dim for a split second, indicating that a snapshot has been taken.
Where to find it: Windows automatically saves this image file. Open File Explorer and navigate to Pictures > Screenshots. Your file will be waiting there as a PNG image.
Note: If your keyboard has a combined Print Screen key that also controls media or brightness, you may need to press Windows + Fn + PrtScn.
3. The Classic Clipboard Method: PrtScn Key
If you want to paste a quick snapshot directly into an email, a chat application (like Discord or Slack), or a document without creating permanent files on your desktop:
How to use it:
Press the PrtScn key by itself.
The entire screen is instantly captured and stored on your system clipboard.
Open your destination app (such as Microsoft Word, Paint, or an email composer), click inside the text or design area, and press Ctrl + V to paste the image.
4. Advanced Capturing: The Standalone Snipping Tool App
If you want to configure delays or explore advanced settings before taking a screenshot, you can launch the dedicated app directly from your system.
How to use it:
Click the Start Menu, type Snipping Tool, and press Enter.
Inside the app interface, you can set a Delay timer (e.g., 3, 5, or 10 seconds). This is extremely useful if you need to capture dropdown menus, tooltips, or hover effects that normally disappear the moment you click away.
Click the New button in the top left to start your timed or standard capture session.
5. Recording Video and Screen Actions: Xbox Game Bar
Sometimes a static image isn’t enough, and you need to record what is happening on your screen. While Windows features dedicated clipping tools, the built-in Xbox Game Bar handles short video clips and troubleshooting recordings seamlessly across all apps—not just games.
How to use it:
Press Windows Logo Key + G to open the Game Bar overlay.
If prompted, check the box confirming “Yes, this is a game” (this works for general desktop environments and apps too).
Locate the Capture widget window.
Click the Start Recording button (or use the shortcut Windows + Alt + R).
Stop the recording when finished. Your video clips will be saved automatically inside your user profile under Videos > Captures.
Summary Cheat Sheet
Shortcut Key Combination
What It Does
Where It Goes
Win + Shift + S
Opens Snip & Sketch toolbar for custom regions
Copied to clipboard & notification center
Win + PrtScn
Instantly captures full screen
Saved as a file in Pictures/Screenshots
PrtScn
Copies full screen to clipboard
Clipboard (ready to paste via Ctrl + V)
Win + Alt + R
Starts/stops background video recording
Saved as MP4 in Videos/Captures
By mastering these built-in keyboard shortcuts and utilities, you can handle any documentation, troubleshooting, or casual sharing task on Windows quickly and efficiently without ever needing third-party software.