Physical Address
304 North Cardinal St.
Dorchester Center, MA 02124
Physical Address
304 North Cardinal St.
Dorchester Center, MA 02124

Safe Mode is an invaluable diagnostic tool for Windows. When your computer encounters persistent errors, crashes frequently, or is infected by stubborn malware, standard troubleshooting methods often fail because third-party applications or corrupt drivers interfere with the operating system’s operation.
By booting into Safe Mode, Windows loads only the bare minimum essential drivers and services required to run. This stripped-down environment allows you to identify the root cause of the problem, uninstall problematic software, update drivers, or run deep antivirus scans without interference from the software that may be causing the issue.
In this guide, we will cover the most reliable and modern methods to boot into Safe Mode on Windows 10 and Windows 11.
Booting into Safe Mode is a safe procedure. However, because Safe Mode disables many non-essential services (such as networking in the basic version), some functions on your computer will be temporarily unavailable.
It is critical to know your local administrator password (the password you use to log in to your PC directly). If your PC is set up to log in automatically using a Microsoft Account (email address), that password will still work. If you rely solely on Windows Hello features like a PIN, fingerprint reader, or facial recognition, be aware that you may be required to enter your full password the first time you log in after booting into Safe Mode.
If your Windows installation is currently working well enough to log in and access the Start menu, this is the most straightforward method to access advanced startup options.
The computer will immediately restart and load a blue menu screen. Continue to Step 4: Navigating the Blue Menu.
If your computer boots but gets stuck at the login screen, or you don’t want to dig through the Settings menus, you can trigger Advanced Startup from the lock screen.
The computer will restart and load a blue menu screen. Continue to Step 4: Navigating the Blue Menu.
If your PC is failing to load Windows completely (e.g., it gets stuck on a black screen, the spinning dots freeze indefinitely, or you see a Blue Screen of Death immediately), you can force Windows to offer recovery options. This method should be used only as a last resort, as repeatedly cutting power to the PC can potentially lead to file system corruption if done excessively.
Eventually, you will reach a blue screen with options. Click the Advanced options button.
You are now in the blue menu screen. Continue to Step 4: Navigating the Blue Menu.
Once you successfully execute Method 1, 2, or 3, your PC will restart and display a blue screen titled “Choose an option.” This is the gateway to advanced troubleshooting.
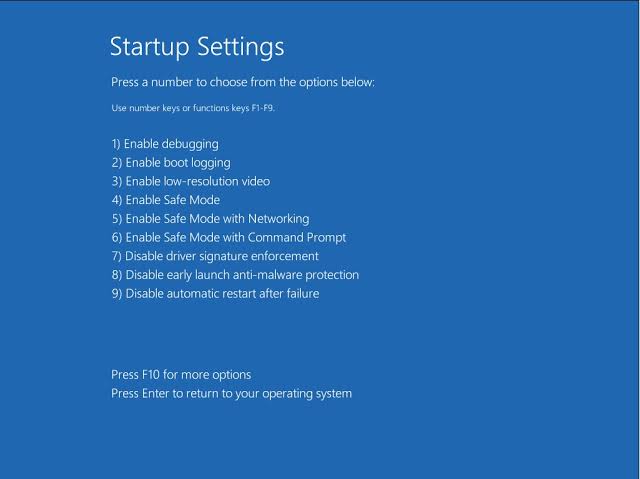
The computer will restart again. When it turns back on, it will present a numbered list of startup options.
You need to press the corresponding number on your keyboard to choose the type of Safe Mode you need:
Once you make your selection, Windows will finish booting into the chosen version of Safe Mode. You will know you are in Safe Mode because your desktop background will be black, and the words “Safe Mode” will appear in small text in all four corners of your screen.
When you have finished diagnosing and fixing the issue, exiting Safe Mode is simple. You do not need to press any special keys during restart.
Your computer will restart normally into your standard Windows desktop environment.
By following this guide, you can confidently access the diagnostic environment provided by Safe Mode on Windows, allowing you to tackle even complex system issues effectively.