All-In-One (AIO) liquid coolers have democratized enthusiast-grade thermals, allowing users to harness the massive heat capacity of water without the terrifying complexity and leak risks of building a custom open-loop system. They offer clean aesthetics, exceptional thermal inertia, and keep bulky metal towers away from fragile motherboard components.
However, this sleek performance relies entirely on a single, hidden mechanical point of failure: the water pump. Unlike a giant metal air cooler that will outlast the apocalypse, an AIO is a consumable component with a finite lifespan. When the pump stops moving liquid, an AIO transforms from a premium cooling solution into a highly effective thermal insulator, capable of driving a CPU to its thermal shutdown threshold in a matter of seconds.
Understanding the mechanical anatomy of these micro-pumps, identifying the acoustic and thermal symptoms of failure, and mastering the strict geometric rules of AIO mounting are essential skills for preventing catastrophic system overheating.
1. The Anatomy of an AIO Micro-Pump
To diagnose a pump failure, you must first understand what is actually spinning inside the block mounted to your CPU.
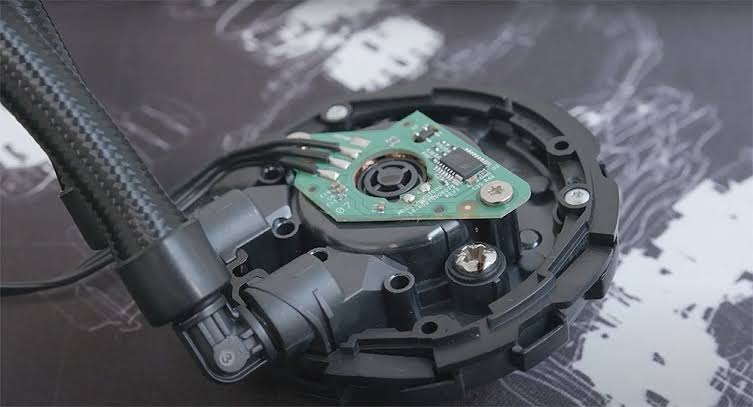
An AIO pump is a marvel of miniaturization. It is typically a centrifugal pump integrated directly above the copper cold plate.
- The Impeller: A tiny plastic or ceramic fan blade suspended in the liquid coolant.
- The Stator: A ring of electromagnetic coils surrounding the impeller.
- The Mechanism: The pump does not use a physical drive shaft. Instead, the stator generates a rotating magnetic field that grips the magnetic core of the impeller, spinning it rapidly (usually between 2,000 and 3,000 RPM). The spinning impeller draws liquid down into the center of the CPU block, forces it through microscopic copper fins to absorb heat, and aggressively pushes it out the exhaust tube toward the radiator.
Because the impeller is suspended in a magnetic field and lubricated by the coolant itself, it operates with virtually zero mechanical friction—as long as the fluid dynamics remain perfect.
2. Identifying the Symptoms of Pump Failure
When an AIO pump fails, the symptoms are far more dramatic and instantaneous than the slow degradation of dried-out thermal paste or dusty fans.
The Instant Thermal Spike (The “Dead Water” Effect)
If the pump motor burns out or the impeller shatters, the water stops moving entirely. The small volume of liquid sitting directly over the CPU absorbs heat until it literally begins to boil.
- Symptom: You turn on the PC. Before Windows even finishes loading to the desktop, the CPU temperature skyrockets to 100°C. The motherboard instantly ramps the radiator fans to a deafening 100% speed, but the temperature refuses to drop. The system becomes unbearably sluggish and may shut itself down entirely (THERMTRIP) within two minutes.
The Tube Temperature Discrepancy (The Touch Test)
In a healthy AIO loop under load, both rubber tubes should feel warm to the touch, with a slight, almost imperceptible temperature difference between the liquid going into the radiator and the liquid coming out.
- Symptom: If you touch the tubes near the CPU block and one tube is blistering hot while the other is completely ice-cold, the fluid is completely stagnant. The heat is radiating up one tube via physical conduction, but no liquid is actively flowing through the loop.
Acoustic Warnings: The Sound of Death
A healthy AIO pump produces a faint, consistent, high-pitched electronic hum. When the mechanics begin to fail, the acoustic signature changes drastically.
- Grinding or Clicking: If the magnetic bearing wears out or the ceramic shaft cracks, the impeller will begin scraping against the plastic housing. This produces a harsh, metallic grinding or rattling sound.
- Gurgling or “Slurping”: This is the sound of cavitation—the pump is sucking in air instead of water. While a few seconds of gurgling on a cold boot is normal as bubbles settle, constant gurgling means the pump is running dry, which will rapidly destroy the bearing.
3. The Achilles Heel: Air Bubbles and Cavitation
The absolute most common cause of premature AIO pump death is not a manufacturing defect; it is incorrect physical installation by the user.
An AIO loop is never filled to exactly 100% capacity at the factory. It is usually filled to about 90% or 95%, leaving a small pocket of air inside the radiator. This air pocket is necessary to allow the liquid to expand when it gets hot without exploding the rubber tubes.
- The Law of Gravity: Air is lighter than water. The air bubble will always travel to the absolute highest physical point in the cooling loop.
- The Fatal Error: If you mount the AIO radiator at the bottom of your PC case, or if you mount it on the front panel with the tubes at the top (and the top of the radiator sits lower than the CPU block), the CPU block becomes the highest point in the loop.
- Cavitation: The air bubble will travel directly into the pump housing. The impeller is designed to push heavy water, not light air. It will spin wildly out of control (cavitation), generating no fluid pressure, producing a horrible gurgling noise, and rapidly burning out the unlubricated motor.
The Golden Rules of AIO Mounting
- Top Mounting (Ideal): Mounting the radiator to the interior roof of the case is the safest orientation. The air bubble gets trapped in the top of the radiator, far above the pump.
- Front Mounting (Acceptable): If you must mount the radiator on the front intake panel, ensure the top edge of the radiator is physically higher than the CPU block. Ideally, the tubes should connect at the bottom of the radiator, ensuring the air bubble stays trapped in the tank at the top, far away from the tube intakes.
4. Permeation: The Inevitable Death by Evaporation
Even if an AIO is mounted perfectly, it has a strict expiration date governed by chemistry and physics.
The flexible tubes connecting the CPU block to the radiator are typically made of FEP (Fluorinated Ethylene Propylene) or specialized rubber. While they are watertight, they are not 100% vapor-tight. At a microscopic level, these materials are slightly porous.
Over months and years of heavy thermal cycling, the heated liquid inside the loop slowly evaporates and escapes directly through the walls of the rubber tubes as a gas. This process is called Permeation.
- The Lifespan: A high-quality AIO will generally lose enough fluid via permeation over 4 to 6 years that the air pocket inside the loop becomes too large.
- The End State: Once too much liquid has escaped, the air bubble eventually makes its way into the pump regardless of how the radiator is mounted. The pump runs dry, thermals collapse, and the unit must be replaced. An AIO is a closed system; you cannot easily top off the fluid like a custom water-cooling loop.
5. Diagnostics and Maintenance Protocols
If your CPU is overheating and you suspect the AIO is to blame, follow this diagnostic checklist before throwing the unit in the trash.
Step 1: Verify the Pump RPM via BIOS/Software
Do not assume the pump is running just because the radiator fans are spinning. The pump is usually plugged into a dedicated AIO_PUMP or W_PUMP header on the motherboard.
- Boot into the BIOS or open HWiNFO64. Check the RPM reading of that specific header.
- A healthy pump should report a steady speed (e.g., 2400 RPM). If it reads 0 RPM, or violently fluctuates between 0 and 500 RPM, the motor is dead or the cable has become unplugged.
Step 2: The “Shake and Tilt” Method (Clearing Air)
If the pump reads a healthy RPM, but the CPU is instantly overheating and the pump is making a gurgling noise, a massive air bubble is trapped in the CPU block.
- The Fix: While the PC is running, carefully physically tilt the entire computer case backward at a 45-degree angle, then forward. You are trying to physically manipulate gravity to coax the air bubble out of the pump housing and force it to travel up the tubes into the radiator. If the gurgling stops and temperatures instantly drop by 40°C, you have successfully cleared the airlock. (You must then verify your radiator mounting to ensure the bubble does not return).
Step 3: Check for Galvanic Corrosion (The Blockage)
If the pump RPM is normal, there are no air bubble sounds, the mounting is perfect, but the CPU is still boiling, the loop has suffered internal chemical degradation.
- Many AIOs use a copper CPU cold plate paired with an aluminum radiator. Mixing these two metals in a liquid loop causes galvanic corrosion. Manufacturers use heavy chemical inhibitors to delay this, but eventually, a thick, slimy, metallic sludge forms inside the liquid. This sludge clogs the microscopic fins inside the CPU block. The water is moving, but it cannot touch the copper to absorb the heat. The unit is permanently destroyed.
6. Replacement and Post-Mortem
Unlike a custom loop where you can replace a failed pump module or clean a clogged block, an AIO is a sealed, consumable appliance. If the pump is dead, or the micro-fins are clogged with corrosion, the entire unit is electronic waste.
When replacing a failed AIO, evaluate why it failed:
- If it lasted 5+ years before slowly losing performance, it died a natural death via permeation. Purchasing a new AIO is perfectly fine.
- If it died in 8 months with a horrible grinding noise, you likely mounted it incorrectly and starved the pump. Ensure the replacement unit is mounted with the radiator above the pump.
- If you find the lifespan of AIOs unacceptable, the only permanent remedy is to transition back to a high-end dual-tower Air Cooler. An air cooler relies on phase-change heat pipes and physics; it has zero moving parts, no liquid to permeate, and a functional lifespan measured in decades.