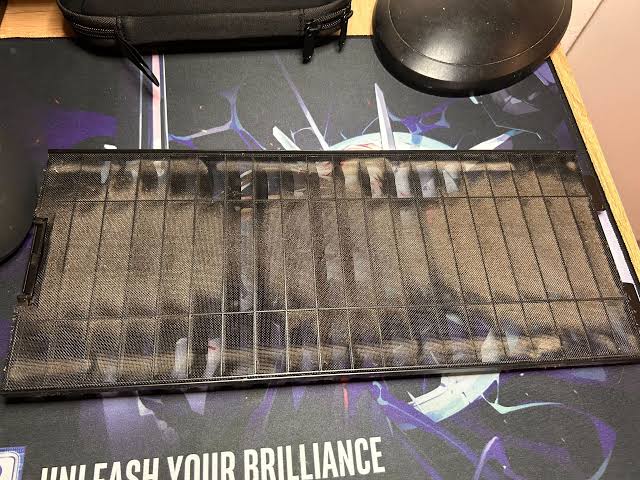
When diagnosing a system that is suffering from thermal throttling, sudden crashes, or jet-engine fan noise, enthusiasts often rush to download complex telemetry software, adjust BIOS voltage curves, or order expensive aftermarket liquid coolers. However, in a vast majority of real-world scenarios, the root cause of hardware degradation is far more mundane, physical, and inevitable: dust.
Dust is the silent killer of high-performance computing. It is a relentless environmental variable consisting of fabric fibers, pet dander, dead skin cells, and microscopic soil particulates. A computer case, with its high-velocity intake fans, acts as a highly efficient localized vacuum cleaner, pulling these particulates directly into the most thermally sensitive components of your hardware.
Understanding the thermodynamics of how dust destroys cooling efficiency, the aerodynamic impact it has on fan blades, and the strict safety protocols required to remove it without destroying delicate silicon is mandatory for maintaining a reliable workstation or gaming rig.
1. The Thermodynamics of Dust: An Insulating Blanket
To understand why dust is so destructive, you must revisit the fundamental goal of PC cooling: transferring heat from a silicon die into a metal heatsink, and then transferring that heat from the metal into the ambient air.
- Loss of Surface Area: A modern CPU or GPU heatsink is composed of dozens of incredibly thin, tightly packed aluminum fins. This design exists to maximize the physical surface area exposed to the passing air. When dust enters a heatsink, it bridges the microscopic gaps between these fins, effectively clogging the channels. This drastically reduces the functional surface area of the cooler.
- Thermal Insulation: Dust is composed of organic matter and silicates, both of which possess exceptionally low thermal conductivity. When a layer of dust coats an aluminum fin or the back of a motherboard PCB, it acts exactly like a heavy winter blanket. It traps the thermal energy against the metal, completely preventing the passing air from absorbing and carrying the heat away.
- The 30% Rule: Empirical testing in hardware labs demonstrates that a mere 2-millimeter layer of caked dust covering a radiator or heatsink can reduce its heat dissipation capacity by up to 30%. For a flagship CPU operating near its thermal limit, a 30% loss in cooling efficiency guarantees instant, severe thermal throttling under load.
2. Aerodynamic Degradation and Fan Failure
Dust does not merely passively insulate; it actively attacks the mechanical components designed to move the air.
- Aerodynamic Stalling: PC case fans and radiator fans feature precisely engineered, curved blades designed to slice through the air and generate static pressure. Because the leading edge of the fan blade hits the air first, dust rapidly accumulates and cakes onto this specific edge. This changes the physical shape of the airfoil, causing the air to detach from the blade prematurely (aerodynamic stalling). The fan loses its ability to push air efficiently, drastically reducing its CFM (Cubic Feet per Minute) output.
- Acoustic Degradation: As the aerodynamic profile is ruined by dust, the fan generates severe turbulence. This turbulence manifests as a loud, high-pitched whining noise, forcing the fan to spin significantly faster (and louder) to move the same amount of air it used to move quietly.
- Bearing Imbalance: Dust rarely accumulates perfectly evenly. If one side of a fan blade accumulates more dust mass than the other, the fan becomes physically unbalanced. Spinning an unbalanced load at 2,000 RPM puts extreme, asymmetrical stress on the internal fluid-dynamic or ball bearings. Over a few months, this imbalance will shatter the bearing, resulting in a horrible grinding noise and permanent fan death.
3. Electrical Hazards: Conductivity and Corrosion
While thermal degradation is the most common issue, dust poses a severe electrical threat in specific environments.
- Moisture Absorption: Standard household dust is highly hygroscopic; it absorbs moisture from the air. In humid climates, a thick layer of dust on a motherboard can become slightly conductive. If this damp dust bridges two exposed solder points on a GPU or motherboard, it can cause a micro-short circuit, leading to random system reboots or permanent hardware failure.
- Vape Residue and Smoker’s Tar: If a PC is located in a room where individuals smoke cigarettes or use vaporizers, the situation escalates from a nuisance to a catastrophe. Smoke and vapor contain sticky, oily resins. When these resins are sucked into a PC, they coat every component in a tacky film. Standard dust then sticks to this film, creating a dense, concrete-like sludge that cannot be blown away with air and rapidly corrodes exposed copper traces.
4. The Cleaning Arsenal: The Right and Wrong Tools
Attempting to clean a PC with the wrong tools is the fastest way to physically destroy a thousand-dollar graphics card.
What NOT to Use
- Standard Vacuum Cleaners: NEVER use a household vacuum cleaner with a plastic hose attachment to clean the inside of a PC. The friction of dust particles rushing through a plastic corrugated hose generates massive amounts of Static Electricity (Electrostatic Discharge, or ESD). If that plastic nozzle touches your motherboard, it can discharge thousands of volts directly into a microchip, instantly killing it.
- Feather Dusters / Swiffer Pads: These are intentionally designed to generate static electricity to attract dust. Keep them far away from exposed circuitry.
- Standard Air Compressors: Garage air compressors used for power tools often have moisture or microscopic amounts of machine oil in their lines. Blasting oil and water vapor onto your motherboard is highly destructive.
The Approved Arsenal
- Canned Air (Gas Dusters): The classic, cheap solution. They do not actually contain air; they contain compressed fluorocarbons that expand into a gas. Warning: You must keep the can perfectly upright. If you tilt it, it will spray freezing liquid propellant onto your components, which can cause thermal shock to warm silicon.
- Electric Datavacs (Air Blowers): The ultimate enthusiast tool. These are specialized, high-powered electric fans with a directional nozzle designed specifically for electronics (e.g., DataVac or XPower). They provide an endless supply of dry, filtered, high-velocity air without the freezing issues of canned air.
- Anti-Static Brushes: Soft-bristled, ESD-safe brushes are required to gently dislodge caked-on dust that air pressure alone cannot remove.
- 99% Isopropyl Alcohol (IPA) & Microfiber: Mandatory for cleaning vape/smoke resin, or cleaning fan blades that have a thick, sticky layer of grime on the leading edges.
5. The Step-by-Step Cleaning Protocol
To safely and effectively restore your system’s airflow, follow this strict operational protocol.
Step 1: Power Down and Discharge
Turn off the PC. Unplug the heavy power cable from the back of the Power Supply Unit (PSU). Once unplugged, press and hold the power button on the front of the PC case for 5 to 10 seconds. This drains all residual electrical charge stored inside the motherboard and PSU capacitors, making the system electrically safe to work on. Take the PC outside or to a well-ventilated garage.
Step 2: The Fan Immobilization Rule (CRITICAL)
This is the most common mistake made by novices. You must never allow compressed air to spin your PC fans freely. If you blast a 120mm case fan with high-velocity air, it can easily spin up to 5,000+ RPM—far beyond its mechanical rating—shattering the bearings. Worse, a spinning DC electric motor acts as a generator. Spinning the fan manually generates a reverse voltage that shoots straight down the fan cable into the motherboard, which can instantly fry the fan controller header.
- The Fix: Always physically hold the fan blade still with your finger or a zip-tie while you blow compressed air over it.
Step 3: Clean the Intake Filters
Remove all magnetic or clip-on dust filters from the front, top, and bottom of the case. These can be safely washed in a sink with warm water. Ensure they are 100% bone-dry before reinstalling them.
Step 4: Blow Out the Heatsinks
Aim your compressed air or Datavac directly into the aluminum fins of the CPU cooler and the graphics card.
- Counter-Flow Cleaning: Dust enters from the front of the heatsink. Therefore, to remove it most effectively, you should blow air through the back of the heatsink, pushing the dust out the same way it came in.
Step 5: The Power Supply (PSU) Protocol
Never open the metal casing of a Power Supply. The capacitors inside a PSU can hold a lethal electrical charge for weeks even when unplugged. To clean a PSU, simply hold its internal fan still with a wooden toothpick through the metal grill, and blow compressed air into the exhaust vent, forcing the dust out the intake.
Step 6: Deep Cleaning Blades and PCBs
If the leading edges of your fan blades are still coated in a hard crust after blowing them out, you must clean them manually. Dampen a microfiber cloth or a cotton swab with 99% Isopropyl Alcohol and gently wipe the blades clean. If the back of your GPU backplate is dusty, a gentle sweep with an anti-static brush followed by a light burst of air will safely clear it.
6. Architectural Defenses: Preventing Dust Infiltration
While you cannot eliminate dust, you can configure your hardware to drastically reduce how often you need to clean it.
- Elevate the PC: The floor is the absolute worst place for a computer. The bottom 12 inches of a room contain the highest concentration of heavy dust, pet hair, and carpet fibers. Simply moving the PC onto a desk, or putting it on a rigid wooden stand 6 inches off the carpet, will cut your dust intake by over 50%.
- Enforce Positive Air Pressure: As discussed in case airflow optimization, ensure your intake fans are pushing slightly more air into the case than your exhaust fans are pulling out. This guarantees that air only enters the case through the front dust filters, while actively bleeding air out of all the unfiltered gaps and seams in the chassis.
- Maintain Your Filters: A front mesh filter only works if air can pass through it. If you let your front filter become completely clogged, your intake fans will suffocate. To compensate for the lack of air, the system will temporarily shift into negative pressure, sucking unfiltered air (and dust) in through the back PCIe slots. Wipe your front mesh filters down with a microfiber cloth once a month.