In the pursuit of maximum computing performance, whether rendering complex 3D environments, compiling massive codebases, or pushing high framerates in competitive gaming, the central processing unit (CPU) acts as the beating heart of your system. However, this immense computational power comes with an inescapable physical byproduct: heat. When a processor generates heat faster than the cooling system can dissipate it, the system must intervene to prevent catastrophic silicon degradation. This protective intervention is known as thermal throttling.
Understanding the precise mechanics of thermal throttling, learning how to accurately diagnose it, and implementing hardware or software-level fixes is an essential skill for any IT professional, PC builder, or power user looking to maximize system longevity and performance.
1. The Physics and Mechanics of Thermal Throttling
To understand why a CPU throttles, you must understand how modern processors are designed to protect themselves at the microscopic level. A CPU contains billions of transistors switching on and off billions of times per second. This electrical resistance generates localized heat.
- Tjunction Max (TjMax): Every processor is programmed by the manufacturer (Intel or AMD) with a maximum safe operating temperature, known as TjMax. For most modern desktop CPUs, this threshold sits between 95°C and 105°C.
- The PROCHOT Signal: Embedded within the CPU silicon is a network of digital thermal sensors. If these sensors detect that the core temperature is rapidly approaching the TjMax threshold, the processor issues a bidirectional hardware interrupt signal known as PROCHOT (Processor Hot).
- Dynamic Frequency Scaling: The moment the PROCHOT signal is triggered, the CPU’s internal power management controller forcefully intervenes. It immediately drops the core clock multiplier (frequency) and drastically reduces the core voltage (Vcore). By lowering the speed and the voltage, the CPU forces itself to generate less heat.
This process happens in milliseconds. The CPU will continue to step down its speed until the temperature stabilizes below the critical threshold. If the cooling failure is so severe that throttling cannot stop the temperature from rising (e.g., a dead water pump), the motherboard will initiate a hard thermal shutdown (THERMTRIP) to cut total system power, saving the silicon from literal melting.
2. Identifying the Symptoms of Thermal Throttling
Thermal throttling rarely announces itself with an explicit pop-up error message. Instead, it manifests as severe, intermittent performance degradation that users often mistakenly attribute to software bugs or insufficient RAM.
- Sudden Framerate Drops (Stuttering): In gaming, the most obvious symptom is extreme frametime variance. You may be playing smoothly at 144 FPS, but suddenly the game freezes or drops to 20 FPS for several seconds, before recovering back to 144 FPS. This happens because the CPU overheats, throttles down to base clocks, cools off, boosts back up, and then immediately overheats again in a vicious cycle.
- Acoustic Cues (Fan Ramping): If your PC case fans or laptop blowers sound like a jet engine continuously ramping up to 100% speed and then spinning down, the motherboard is desperately trying to push enough air to stave off the TjMax threshold.
- Inconsistent Benchmark Scores: If you run a synthetic stress test (like Cinebench R23) back-to-back, a healthy system will produce nearly identical scores every time. A thermally throttling system will show a high score on the first run, followed by drastically lower scores on subsequent runs as the heatsink becomes saturated.
- Sluggish OS Responsiveness: During heavy workloads (like exporting a Premiere Pro video), even simple background tasks like moving the mouse cursor, opening a web browser, or typing text may lag significantly as the CPU cuts its processing cycles to survive.
3. Diagnostic Tools: Proving the Throttle
Do not guess if your system is throttling; prove it with empirical data. You need software capable of polling the CPU’s internal sensors in real-time.
- HWiNFO64: This is the undisputed gold standard for hardware monitoring. It reads every sensor on your motherboard. When running a heavy workload, look for the row labeled
Core Thermal Throttling. If the value changes from No to Yes, your CPU is actively throttling. It also records the “Maximum” temperatures reached during a session, allowing you to see if you hit 100°C while you were tabbed into a game.
- MSI Afterburner & RivaTuner: For gamers, this combination allows you to project an On-Screen Display (OSD) in the corner of your monitor while playing. You can monitor CPU temperature, clock speeds, and usage in real-time. If you see the temperature hit 95°C followed immediately by the clock speed dropping from 5.0GHz to 3.2GHz, you have visually confirmed thermal throttling.
- Intel XTU / AMD Ryzen Master: The official utility software from the chipmakers. Both provide clear, visual “Thermal Throttling” flags that turn red the moment the CPU pulls back power.
4. Root Causes of CPU Overheating
If you have confirmed that your CPU is throttling, you must identify the mechanical or software failure causing the heat buildup.
Mechanical and Hardware Failures
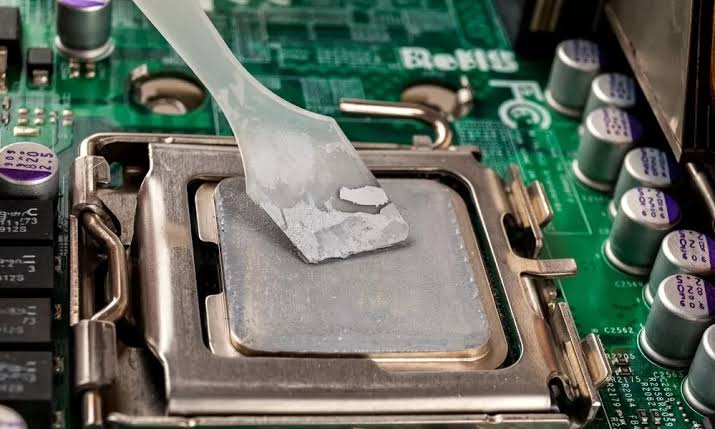
- Degraded Thermal Paste: Thermal paste fills the microscopic air gaps between the CPU heatspreader (IHS) and the copper cold plate of the cooler. Over 2-4 years, standard paste dries out, cracks, and turns into an insulator rather than a conductor.
- Insufficient Cooler Mounting Pressure: If the screws holding the CPU cooler to the motherboard are not tightened down evenly in a cross-pattern, the cooler will not sit completely flat against the CPU. Even a fraction of a millimeter of tilt ruins thermal transfer.
- AIO Pump Failure: All-In-One (AIO) liquid coolers are fantastic for performance, but they have a fatal flaw: the mechanical water pump. If the pump dies, the water stops moving. The liquid directly above the CPU boils, and the processor will hit 100°C within 60 seconds of turning on the PC, even at idle.
- Peel the Plastic: It is a notorious builder error to forget to peel the clear protective plastic sticker off the bottom of a brand-new CPU cooler before installing it. Plastic is a thermal insulator; leaving it on guarantees instant thermal throttling.
Environmental and Airflow Issues
- Dust Accumulation: Dust acts exactly like a heavy winter blanket. When it clogs the aluminum fins of a heatsink or a radiator, air can no longer pass through to carry the heat away.
- Case Airflow Choking: Putting a high-end CPU into a case with a solid glass front panel and tiny side vents suffocates the intake fans. If the fans cannot pull fresh, cool ambient air from the room, they end up recirculating the same hot, stagnant air inside the chassis.
Software and Configuration Causes
- Aggressive Auto-Voltages: Many modern motherboards (especially high-end gaming boards) intentionally supply far more voltage to the CPU than it actually needs by default, just to ensure absolute stability. This excess voltage generates massive, unnecessary heat.
- Unrealistic Power Limits: Intel CPUs rely on PL1 (Long Duration) and PL2 (Short Duration) power limits. Motherboard manufacturers often disable these limits entirely out of the box, allowing the CPU to draw 250+ watts continuously. Without a massive liquid cooler, this will instantly trigger thermal throttling.
5. Actionable Fixes and Mitigations
Resolving thermal throttling requires matching the fix to the root cause. Here is the hierarchy of solutions, from basic maintenance to advanced tuning.
Level 1: Maintenance and Airflow
- Deep Clean the System: Power down the PC, unplug it, take it outside, and use a can of compressed air or an electric datavac to blow all dust out of the CPU heatsink fins, radiator meshes, and case intake filters.
- Re-Paste the CPU: Remove the CPU cooler, wipe away the old, crusty thermal paste using 99% isopropyl alcohol and a microfiber cloth. Apply a fresh dot (roughly the size of a small pea) of high-quality aftermarket thermal paste (like Thermal Grizzly Kryonaut or Noctua NT-H1), and remount the cooler ensuring tight, even pressure.
- Optimize Case Airflow: Ensure your case has “Positive Pressure.” You want more fans blowing cool air in (intakes on the front/bottom) than fans blowing hot air out (exhausts on the back/top). This forces hot air out of every crevice of the case and prevents dust from being sucked in through unfiltered gaps.
Level 2: BIOS and Software Tuning
- Undervolting (The Ultimate Fix): This is the process of manually lowering the core voltage (Vcore) supplied to the CPU without lowering its clock speed. Because heat scales exponentially with voltage, a tiny reduction (e.g., an offset of -0.050v to -0.100v) can drop CPU temperatures by 10°C to 15°C while maintaining 100% of the processor’s performance. This can be done in the motherboard BIOS or via software like Intel XTU or AMD’s Curve Optimizer.
- Enforce Factory Power Limits: Go into your motherboard BIOS and find the CPU power management section. If it is set to “Multi-Core Enhancement” or “Unlimited,” change it back to the official Intel or AMD specifications (e.g., enforcing a strict 125W or 253W limit). The CPU will run slightly slower in extreme rendering tasks, but it will stop overheating completely.
- Adjust Fan Curves: By default, motherboard fan profiles are often tuned for silence rather than performance. Enter the BIOS and aggressively adjust the PWM fan curve. Set the fans to spin at 50% when the CPU hits 50°C, and ramp up to 100% when the CPU hits 80°C.
Level 3: Hardware Upgrades
- Ditch the Stock Cooler: The tiny, low-profile coolers included in the box with budget CPUs are barely sufficient for web browsing. If you are gaming or rendering, you must upgrade to a robust aftermarket tower air cooler (with at least 4 copper heat pipes) or a 240mm+ AIO liquid cooler.
- Upgrade the PC Case: If your case has a solid front panel, no amount of fans or water cooling will fix the lack of fresh air. Moving your components to a “high-airflow” case featuring a full mesh front panel is often the single most effective hardware change you can make to drop overall system temperatures.