As our digital footprints expand, relying on a chaotic collection of scattered USB flash drives, external hard drives, and fragmented cloud subscriptions becomes both inefficient and dangerous. Whether you are a small business owner managing critical client data, a photographer with terabytes of RAW files, or a home user wanting to stream a massive movie collection to any TV in the house, a centralized storage solution is essential.
Enter the NAS—Network Attached Storage. A NAS is essentially a dedicated, highly optimized computer built for one specific purpose: storing data and serving it over a local network (LAN) 24/7. It acts as your own private, highly secure cloud, offering the massive capacity of local storage with the remote accessibility of services like Google Drive or Dropbox.
Setting up a NAS transforms how you interact with your data. This comprehensive guide covers everything from selecting the right hardware and hard drives to configuring the network, managing user permissions, and securing your centralized server against external threats.
1. Understanding the NAS Architecture
To understand how to set up a NAS, it is vital to understand what it actually is. Unlike a simple external hard drive (Direct Attached Storage, or DAS) that plugs into a single computer via a USB cable, a NAS connects directly to your network router or switch via an Ethernet cable.
Because it sits on the network, every authorized device in your home or office—Windows PCs, MacBooks, Linux workstations, smartphones, smart TVs, and gaming consoles—can access the data simultaneously.
A NAS consists of three core components:
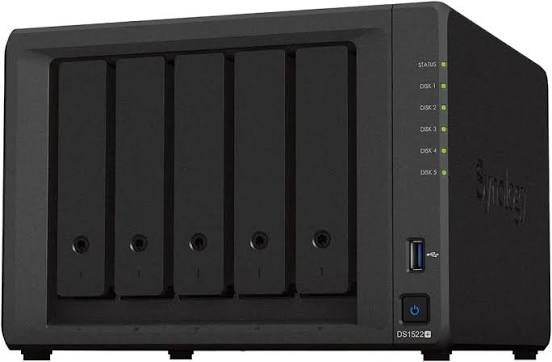
- The Hardware Enclosure: This includes the chassis, the motherboard, a low-power CPU, RAM, a power supply, and multiple SATA bays to hold the hard drives.
- The Storage Media: The actual Hard Disk Drives (HDDs) or Solid State Drives (SSDs) that hold your data.
- The Operating System: A specialized, lightweight OS (usually based on Linux) designed strictly for file routing, storage management, and running containerized applications. Popular examples include Synology DiskStation Manager (DSM), QNAP QTS, TrueNAS, and Unraid.
2. Choosing the Right NAS Platform: Pre-Built vs. DIY
The first major decision in setting up a NAS is deciding whether to buy a commercial pre-built system or build a custom server from scratch.
The Pre-Built Route (Synology, QNAP, Asustor)
For 90% of consumers and small businesses, purchasing a pre-built enclosure from a major manufacturer is the best path.
- Turnkey Convenience: These systems are plug-and-play. You insert the drives, plug in the power and network cables, and a wizard guides you through the setup in a web browser.
- Software Ecosystem: The true value of brands like Synology is their software (DSM). It provides a beautiful, desktop-like graphical interface inside your browser, allowing you to install backup apps, photo managers, and media servers with a single click, without touching a command line.
- Form Factor and Power: They are extremely compact, quiet, and consume very little electricity, making them perfect for sitting on a desk or a living room shelf.
The DIY Route (TrueNAS, Unraid, OpenMediaVault)
For IT professionals, homelab enthusiasts, and enterprise environments, building a custom NAS offers unparalleled power and flexibility.
- Cost-to-Performance Ratio: You can repurpose older PC hardware or build a highly powerful server with server-grade components (like ECC RAM and Xeon processors) for a fraction of the cost of a high-end pre-built NAS.
- Advanced File Systems: Building your own NAS allows you to utilize ZFS (via TrueNAS), an enterprise-grade file system that offers incredible data integrity, self-healing architecture, and instantaneous snapshots to protect against data rot and ransomware.
- Hardware Freedom: You are not locked into a manufacturer’s proprietary ecosystem. You can expand your system with PCIe network cards (e.g., 10-Gigabit Ethernet), hardware RAID controllers, or massive 24-bay server chassis.
3. Selecting NAS-Grade Hard Drives
You cannot simply pull an old hard drive out of a dusty desktop PC and expect it to survive in a NAS. A NAS operates 24 hours a day, 7 days a week, 365 days a year, with multiple drives packed tightly together, generating heat and intense physical vibration.
When purchasing drives, you must strictly adhere to the following rules:
- Buy NAS-Specific Drives: Manufacturers design specific lines for this workload, most notably Western Digital Red (Plus/Pro) and Seagate IronWolf (Pro). These drives feature specialized firmware optimized for RAID configurations, advanced rotational vibration (RV) sensors to counteract the shaking of neighboring drives, and higher endurance ratings.
- Avoid SMR (Shingled Magnetic Recording): This is the most critical rule of buying NAS drives. SMR is a cheap manufacturing technique used in budget drives that overlaps data tracks to increase capacity. In a NAS environment (especially when rebuilding a failed RAID array), SMR drives cause catastrophic performance collapse and can literally crash the storage pool. Always verify you are buying CMR (Conventional Magnetic Recording) drives.
- Matching Capacities: While some advanced systems like Unraid allow for mixed drive sizes, standard RAID arrays require all drives to be the exact same capacity. If you mix a 4TB drive with an 8TB drive in standard RAID, the system will treat the 8TB drive as if it were only 4TB, wasting half your investment.
4. The Setup and Initialization Process
Once you have your hardware and drives, the physical setup is straightforward.
- Installation: Slide the hard drives into the drive sleds and lock them into the bays. Connect the NAS directly to your main router or network switch using the highest quality Ethernet cable available (Cat5e or Cat6). Connect the power and turn it on.
- Discovery: Because the NAS has no monitor output, you must find it on your network. Manufacturers provide discovery tools (like
find.synology.com or QNAP Qfinder). Alternatively, you can log into your router’s admin panel and look at the DHCP client list to find the IP address assigned to the NAS.
- OS Installation: Open a web browser, type in the IP address, and the setup wizard will begin. The NAS will format the raw hard drives, download the latest version of its operating system from the internet, and install it onto a hidden partition across the drives.
5. Configuring Storage Pools and Volumes
Before you can save a single file, you must tell the NAS how to mathematically organize the raw hard drives. This is the most permanent step in the setup process.
- Creating a Storage Pool (RAID): You must group the physical drives into a single logical pool. This is where you select your RAID type (Redundant Array of Independent Disks). If you have a 4-bay NAS, you might choose RAID 5. This configuration stripes your data across all four drives while dedicating the equivalent capacity of one drive to parity data. This means if one hard drive physically dies, you lose absolutely zero data; the system simply recalculates the missing data on the fly until you insert a replacement drive.
- Creating a Volume: Once the pool is built, you carve out a Volume. Think of the Storage Pool as a plot of land, and the Volume as the foundation of the house. You will format the volume using a file system (usually Btrfs or EXT4 on pre-built systems, or ZFS on custom builds). Btrfs is highly recommended for its support of data scrubbing and instantaneous snapshots.
- Shared Folders: Inside the volume, you create Shared Folders (e.g., “Family Photos”, “Financial Records”, “Plex Media”). These are the actual folders that will appear on your computers when you connect to the NAS.
6. User Management and Network Protocols
A NAS is a multi-user environment. Security dictates that not everyone on the network should have access to everything.
- User Accounts: Create individual accounts for every person who will use the NAS.
- Permissions: Assign strict Read/Write, Read-Only, or No Access permissions to the Shared Folders based on the user. Your accountant should have Read/Write access to “Financials”, while the kids’ iPads should only have Read-Only access to the “Movies” folder to prevent accidental deletion.
- Network Protocols (SMB vs. NFS): To access these folders from your PC, the NAS uses network protocols.
- SMB (Server Message Block): The universal standard. It works natively with Windows, macOS, and Linux. You simply open Windows Explorer, type
\\IP_Address_of_NAS, and map the folder as a Network Drive (e.g., your Z: drive).
- NFS (Network File System): A faster protocol native to Linux/Unix systems, heavily used when mounting storage to hypervisors or dedicated Linux servers, but less user-friendly for standard desktop environments.
7. Essential NAS Applications (Beyond Simple Storage)
Treating a modern NAS simply as a dumb hard drive on the network is a massive waste of its potential. Through their respective app stores (or via Docker containers), a NAS can replace dozens of expensive cloud subscriptions.
- Automated Backup Hub: A NAS should be the centerpiece of your backup strategy. You can configure it to automatically pull backups from your Windows PCs, MacBooks (via native Time Machine support), and even sync with external cloud providers like Google Drive or AWS S3 for off-site redundancy.
- Media Streaming (Plex/Jellyfin): By installing Plex Media Server, your NAS becomes a personal Netflix. It catalogs your downloaded movies and TV shows, downloads metadata and posters, and streams them flawlessly to smart TVs and phones anywhere in the world.
- Private Cloud (Nextcloud/Synology Drive): These applications replace Dropbox. They install a client on your laptop that syncs a specific folder to the NAS instantly. You get the seamless experience of a commercial cloud service, but your data never leaves your physical possession, and you have terabytes of space without monthly fees.
- Docker Integration: Advanced users can utilize Docker to run lightweight, isolated containers on the NAS, hosting everything from home automation platforms (Home Assistant) to password managers (Bitwarden) and ad-blockers (Pi-hole).
8. Hardening the NAS: Security Best Practices
Because a NAS holds your most critical data, securing it is not optional; it is mandatory.
- Disable the Default Admin: Hackers will constantly try to brute-force the default “admin” account. Create a new administrative user with a complex name, log in with it, and completely disable the default “admin” account.
- Enable 2FA (Two-Factor Authentication): Require an authenticator app (like Google Authenticator or Authy) to log into the NAS dashboard.
- Never Expose the NAS to the Open Web: Never use your router’s port forwarding to expose the NAS management interface (ports 5000/5001 or 80/443) directly to the internet. If you need remote access away from home, set up a secure VPN server (like WireGuard, Tailscale, or OpenVPN) on your router or NAS. You connect to the VPN on your phone, and only then can you securely tunnel into the NAS.
- Utilize Snapshots: If you use the Btrfs or ZFS file systems, set up automated daily snapshots. If a computer on your network gets infected with ransomware and encrypts the mapped network drives on the NAS, a snapshot allows you to literally roll back the entire file system to the exact state it was in yesterday, completely neutralizing the ransomware in seconds.
- Uninterruptible Power Supply (UPS): A NAS hates sudden power loss. A power outage while the NAS is writing data to a RAID array can corrupt the entire storage pool. Always plug the NAS into a battery backup (UPS) and connect the USB data cable between them. When the power goes out, the UPS signals the NAS to safely unmount its drives and gracefully shut down before the battery dies.